
You’re trying to get something useful out of the X API, not just make a request that returns JSON. Maybe you want to pull your last 200 posts, compare which hooks earned attention, or build a reply workflow that doesn’t require manual scrolling all day. Twitter API examples are valuable when they show how to combine authentication, field selection, pagination, and rate-limit handling into a workflow you can run in production on X (formerly Twitter).
What You Can Build With Twitter API Examples
A lot of people start with one question, then quickly need three different endpoints. A founder might want to pull recent posts from their own account, a creator might want to compare engagement across hooks, and an analyst might want to monitor keywords without refreshing the X app all day. That’s why useful twitter api examples rarely stay inside one tiny request. They usually combine timeline reads, search, write actions, and rate-limit handling into one repeatable workflow.
The X API is built around REST endpoints that return JSON, so the practical unit isn’t “the API” in the abstract. It’s a specific request for a specific job. For example, you might read a timeline, fetch a single post, search recent mentions, publish a reply, or upload media, then stitch those responses into a dashboard or scheduler. If you’re building a content system, the same patterns can support analytics, reply generation, saved-post analysis, and competitor tracking.
Practical rule: if your workflow needs history, context, or repeated measurement, plan on saving responses somewhere outside X. The API gives you structured data, not a finished database.
That also means the scope of your project matters. A quick proof of concept can be a single read request plus a table in your own app. A production tool usually needs pagination, field selection, retries, and token handling. If your goal is broader creative production, teams that also need to create studio-quality videos often pair social research with a separate content workflow so the X data stays focused on ideas, not media production.
Fetching a User Timeline and a Single Post
The most common read pattern is still the simplest one: get a timeline, inspect the fields, and rank posts by engagement. The post object can include text, timestamp, conversation context, author metadata, and engagement metrics such as impressions, likes, reposts, replies, quotes, and video views. For practical analysis, your example should explicitly ask for the metrics you care about instead of relying on defaults.
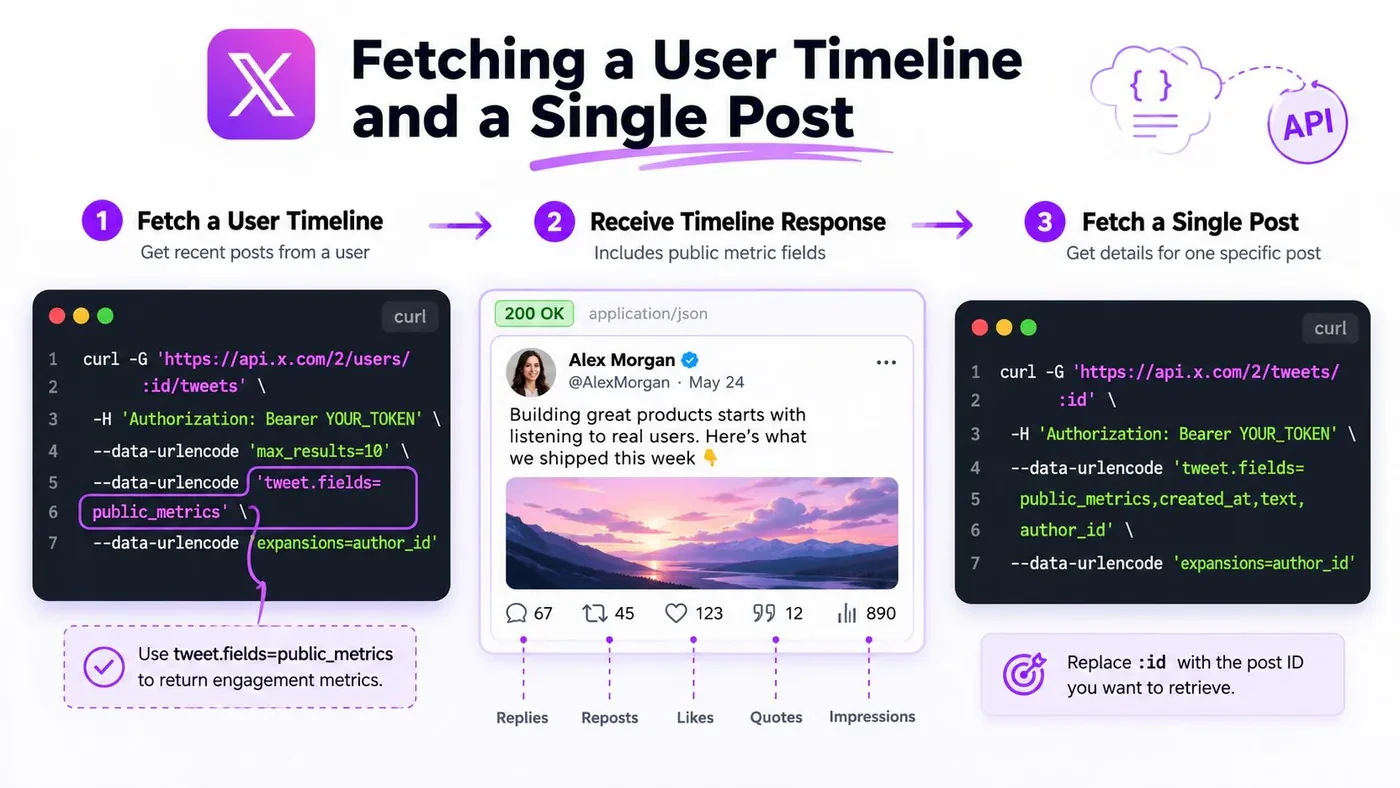
A timeline request with metrics
A typical v2 request pulls posts for a user and adds tweet.fields=public_metrics so the response includes counts you can sort later. The public metrics object is what makes this useful for content review, because you can compare posts without manually opening each one. The post object is the core content unit, so replies, reposts, and quotes all sit inside the same model, which helps when you’re analyzing conversation-aware content.
The same pattern in curl looks like this:
curl --request GET \
  --url "https://api.x.com/2/users/:id/tweets?tweet.fields=public_metrics,created_at,author_id" \
  --header "Authorization: Bearer YOUR_BEARER_TOKEN"
And in Python:
import requests

url = "https://api.x.com/2/users/:id/tweets"
params = {
    "tweet.fields": "public_metrics,created_at,author_id"
}
headers = {
    "Authorization": "Bearer YOUR_BEARER_TOKEN"
}

response = requests.get(url, headers=headers, params=params, timeout=30)
response.raise_for_status()
data = response.json().get("data", [])

for post in data:
    metrics = post.get("public_metrics", {})
    print(post["id"], metrics.get("like_count"), metrics.get("repost_count"))
The key move is to store the data array in a list or DataFrame, then sort by engagement, compare formats, or calculate averages. That’s the step most starter examples skip, and it’s the step that turns a request into a decision tool.
For context on how timeline data can feed analysis workflows, this guide to analytics for another account is a useful companion if you’re comparing your own account to competitors.
Choosing the Right Auth Flow for Your Examples
A lot of beginner tutorials hand you a bearer token and stop there. That works for public reads on endpoints that support app-only access, but it breaks the moment you want to act on a user’s account. The decision is simple in practice. Use app-only authentication for supported public reads, and use user-context authentication when the app is posting, liking, reposting, bookmarking, or muting on someone’s behalf.
Read requests and write requests do not use the same trust model
For supported public reads, an app-only bearer token is enough. That fits recent search, filtered stream, and other requests that only need public data. For writes, use OAuth 2.0 Authorization Code with PKCE or OAuth 1.0a user context, with the scopes and app permissions required by the endpoint. The official X authentication overview explains the available methods. That separation matters because the API is checking both who the app is and whether the user authorized the requested action.
A read request can look like this:
curl --request GET \
  --url "https://api.x.com/2/users/by/username/jack" \
  --header "Authorization: Bearer YOUR_BEARER_TOKEN"
A write flow needs user consent and the correct authentication method. If you’re building a posting tool, don’t try to force an app-only bearer token into a write endpoint and hope it behaves differently.
The official documentation and SDK examples are useful reference libraries, but treat them as starting points. Production code still needs secure token storage, status checks, retries, pagination, logging, and a clear policy for user consent.
Bearer token for supported public reads. OAuth 2.0 PKCE or OAuth 1.0a for user actions. If the app is acting on someone’s account, assume it needs user-context authentication.
Posting Tweets and Uploading Media With Code Examples
Posting is where many examples fail in real life, because the request looks easy but the authentication rules are strict. The minimum viable write request is a POST to the posts endpoint with a JSON body that contains text. For a basic text post, the shape is straightforward, but the call only works with the right user-context permission.
A minimal write request
curl --request POST \
  --url "https://api.x.com/2/tweets" \
  --header "Authorization: Bearer YOUR_USER_CONTEXT_TOKEN" \
  --header "Content-Type: application/json" \
  --data '{"text":"Hello, world! This is my first post via the X API."}'
In Python, the same request is mostly about headers and JSON serialization:
import requests

url = "https://api.x.com/2/tweets"
headers = {
    "Authorization": "Bearer YOUR_USER_CONTEXT_TOKEN",
    "Content-Type": "application/json"
}
payload = {
    "text": "Hello, world! This is my first post via the X API."
}

response = requests.post(url, headers=headers, json=payload, timeout=30)
response.raise_for_status()
print(response.json())
JavaScript follows the same logic, but the body and headers are handled a little differently:
const response = await fetch("https://api.x.com/2/tweets", {
  method: "POST",
  headers: {
    Authorization: "Bearer YOUR_USER_CONTEXT_TOKEN",
    "Content-Type": "application/json",
  },
  body: JSON.stringify({
    text: "Hello, world! This is my first post via the X API.",
  }),
});

if (!response.ok) {
  throw new Error(`X API request failed with status ${response.status}`);
}

const data = await response.json();
console.log(data);
If you need media, upload it first with the v2 POST /2/media/upload endpoint, then attach the returned media ID when you create the post. Larger videos and other large files use the v2 chunked-upload flow. This is a common place to trip over user-context authentication and media processing, so keep upload and post creation as two explicit steps. For a broader automation comparison, this overview of Twitter bot maker tools is useful if you’re deciding whether to hand-roll the write path or wrap it in a no-code layer.
A final production note: repeated test posts should use distinct content. If a create request returns a 403, check your app permissions, user scopes, and token type before treating it as a platform bug.
Searching and Streaming Tweets in Near Real Time
Search and stream solve different problems, even though beginners often treat them like the same thing. Search is for pulling a snapshot. Stream is for receiving live matches as they happen. That distinction matters if you’re building alerts, mention monitoring, or keyword tracking.
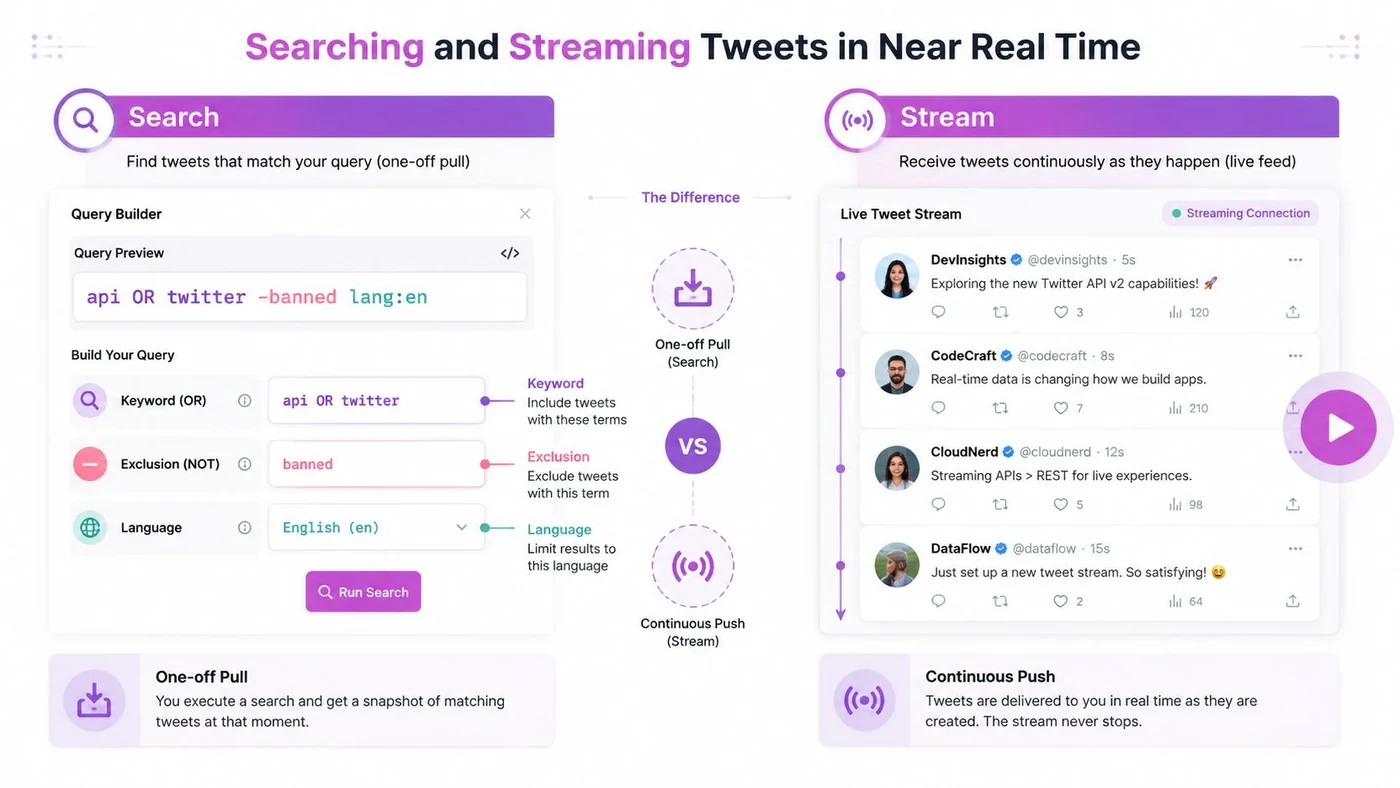
Recent search for a bounded window
The recent-search endpoint returns posts from the last seven days, which is the part many new builders miss. A query can combine keywords, exclusions, and language filters, so a real search example is more than just a single word.
curl --request GET \
  --url "https://api.x.com/2/tweets/search/recent?query=api%20OR%20twitter%20-banned%20lang:en" \
  --header "Authorization: Bearer YOUR_BEARER_TOKEN"
That pattern is ideal for snapshot analysis, campaign monitoring, or collecting a research set before you decide what to build next. The query syntax matters because the API is only as useful as the filters you apply to it. If you need operator practice, this guide to advanced search operators is a helpful companion.
Streaming for live monitoring
Streaming is the better fit when you want continuous inbound data. A filtered stream rule can watch for a cashtag, keyword, or mention pattern, then keep the connection open so your app receives matching posts as they arrive.
import requests

url = "https://api.x.com/2/tweets/search/stream"
headers = {"Authorization": "Bearer YOUR_BEARER_TOKEN"}

with requests.get(url, headers=headers, stream=True, timeout=90) as response:
    response.raise_for_status()
    for line in response.iter_lines():
        if line:
            print(line.decode("utf-8"))
Use search when you want a bounded dataset. Use filtered stream when you need a live feed. If you need geographic trend names rather than matching posts, X also exposes a v2 trends-by-WOEID endpoint, so choose that endpoint instead of trying to turn search into a trends product.
Pagination, Filtering, and the Power of Fields and Expansions
The responses that matter in production are the ones that arrive with enough context to avoid a second request. That’s where tweet.fields, expansions, and user.fields save time. Default post objects give you the basics, while fields and expansions let you inline related data such as authors and media.
Pull more context in one request
A good request doesn’t just return a post. It returns the post plus the pieces you’ll analyze. If you need author information with the post, expand the author instead of doing a follow-up lookup. That makes downstream code simpler and cuts down on extra round trips.
curl --request GET \
  --url "https://api.x.com/2/tweets/search/recent?query=product%20launch&tweet.fields=public_metrics,created_at&expansions=author_id&user.fields=name,username,public_metrics" \
  --header "Authorization: Bearer YOUR_BEARER_TOKEN"
A pagination loop is the other half of the same problem. X returns a next_token in meta when more results exist. Pass that value back as pagination_token, then keep requesting until the response stops returning a token.
import requests

all_posts = []
pagination_token = None

while True:
    params = {
        "query": "product launch",
        "tweet.fields": "public_metrics,created_at",
        "expansions": "author_id",
        "user.fields": "name,username,public_metrics"
    }
    if pagination_token:
        params["pagination_token"] = pagination_token

    response = requests.get(
        "https://api.x.com/2/tweets/search/recent",
        headers={"Authorization": "Bearer YOUR_BEARER_TOKEN"},
        params=params,
        timeout=30
    )
    response.raise_for_status()
    payload = response.json()

    all_posts.extend(payload.get("data", []))
    pagination_token = payload.get("meta", {}).get("next_token")
    if not pagination_token:
        break
If you’re filtering for visual research, you can also add has:images or has:videos so the results only surface posts with the media type you need. That’s often cleaner than downloading every post and removing noise later.
The best API request is the one that returns enough context to avoid a second lookup. Expansions usually beat extra network round trips unless you deliberately need a separate database model.
Rate Limits, 429 Errors, and How to Handle Them
Rate limits are a core part of the X API contract. X enforces limits per endpoint, not as one global cap, and the documented windows commonly use 15-minute or 24-hour periods. If you exceed a limit, the API returns a 429 error until the window resets. The useful part is that the response headers tell you how close you are before the failure, so you can slow down before your workflow breaks.
Read the headers before the request fails
The response exposes x-rate-limit-limit, x-rate-limit-remaining, and x-rate-limit-reset, so your code can back off before it starts throwing errors. A simple helper can check remaining quota before the next call, then pause or skip if the endpoint is getting tight.
def can_call(response):
    remaining = int(response.headers.get("x-rate-limit-remaining", 0))
    reset = response.headers.get("x-rate-limit-reset")
    return remaining > 0, reset
Billing limits matter too, but they are separate from rate limits. X now uses pay-per-use API pricing: credits are deducted by resource or action, qualifying reads of your own data cost less, and self-serve pay-per-use access has a monthly Post-read cap. Enterprise access uses custom pricing and volume limits.
X API access models at a glance
| Access model | Current billing or cap | Typical example project |
|---|---|---|
| Pay-per-use | Credit-based pricing; Post reads and write actions are billed by resource or request | Prototypes, small tools, and production apps within the self-serve cap |
| Owned Reads | Reduced per-resource pricing for qualifying requests to your own account data | Personal analytics, account dashboards, and content review tools |
| Enterprise | Custom contract, higher or custom volume, and dedicated support | Large-scale data products, high-volume monitoring, and custom access needs |
The official rate-limit reference remains the source of truth for request ceilings because limits vary by endpoint and authentication context. Treat billing budgets and technical request windows as two separate controls in your application.
Exponential backoff is still the right default. If a request gets throttled, wait, retry with jitter, and let the window reset instead of hammering the endpoint.
What the Official API Cannot Do and the Workarounds
The most useful thing a beginner can learn is not just what the API does, but where it stops. The official API does not mirror every consumer-app surface or expose private account information such as user emails and phone numbers. Access to posts, user graphs, analytics, and history also depends on authentication, endpoint availability, billing, and rate limits.
Some older guides say X has no v2 trends endpoint. That is no longer accurate: X now provides trends by WOEID and personalized trends. It still does not mean every curated story, recommendation, or private graph detail visible elsewhere is available as a public API response.
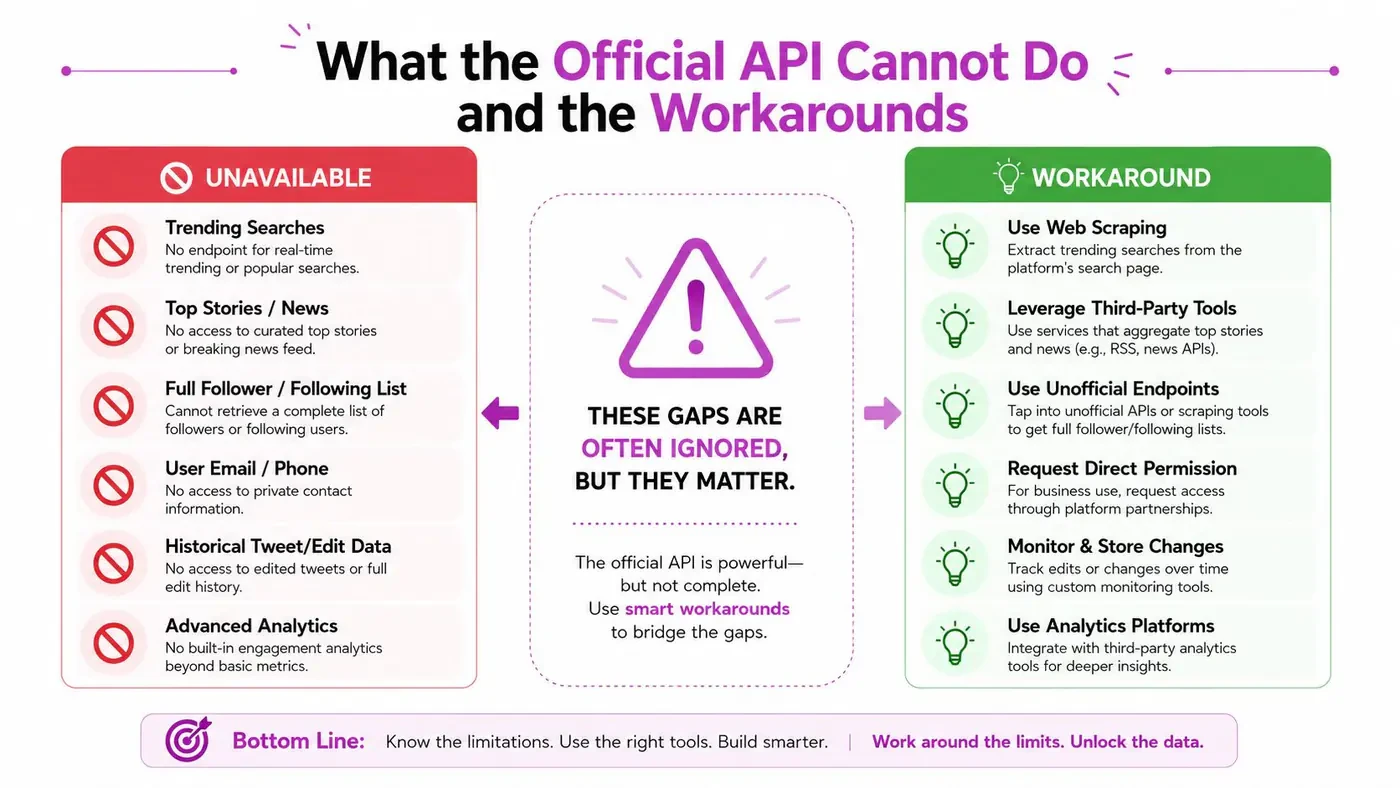
What builders do instead
Serious builders usually combine a few smaller moves. They use recent search for fresh data, filtered stream for live monitoring, trend endpoints for geographic trend names, and their own snapshots for niche momentum over time. They also rely on high-quality filters and post-processing to reduce noise, because raw API results are rarely clean enough to ship as-is.
A simple gap-handling pattern looks like this:
- Collect recent posts regularly. Save the response instead of treating it as disposable.
- Filter aggressively. Use operators and exclusions so the dataset is closer to your actual question.
- Store snapshots. Historical analysis depends on a durable archive, not only a live response.
- Compare time windows. That’s how you recover movement, momentum, and change for your specific niche.
- Accept the gap. If X doesn’t expose the data, don’t force the wrong endpoint to act like it does.
Third-party data providers exist because some gaps are real, but they’re workarounds for limitations, not magic replacements for the official API. If your workflow depends on a data surface the official API does not provide, the right answer is usually a different data strategy, not a cleverer curl command.
Turning API Examples Into Real Growth Workflows
The examples start as requests, then turn into repeatable systems. That’s the point where creators, founders, and analysts get real value. A personal analytics loop can pull your own posts on a schedule, rank them by metrics, and show which hooks deserve another pass. A reply-discovery loop can search for relevant conversations, expand author context, and draft responses that fit the thread. A content-research loop can search for high-performing structures, save the best matches, and turn them into new ideas.
Three workflows that actually map to the API
A practical analytics workflow starts with a user timeline pull, stores the posts in your own database, and sorts them by performance over time. A reply workflow starts with search, adds author expansions, and uses that context to draft a more relevant answer than “great post.” A research workflow uses search plus filters to find patterns, then archives the results in a collection so you can revisit what worked.
If you want a product layer on top of that, Xholic’s Engage, Inspiration Library, and Xholic Brain fit this kind of loop by helping surface relevant conversations, save useful posts, and remember your context over time. That’s useful when the workflow is less about raw API access and more about deciding what to do with the data once you have it.
For automation-minded teams, this guide to Twitter automation tools for growth is a good next read if you’re comparing custom code to a managed workflow. The main lesson stays the same. The API gives you building blocks, but the growth system comes from how you combine them.
Quick Reference
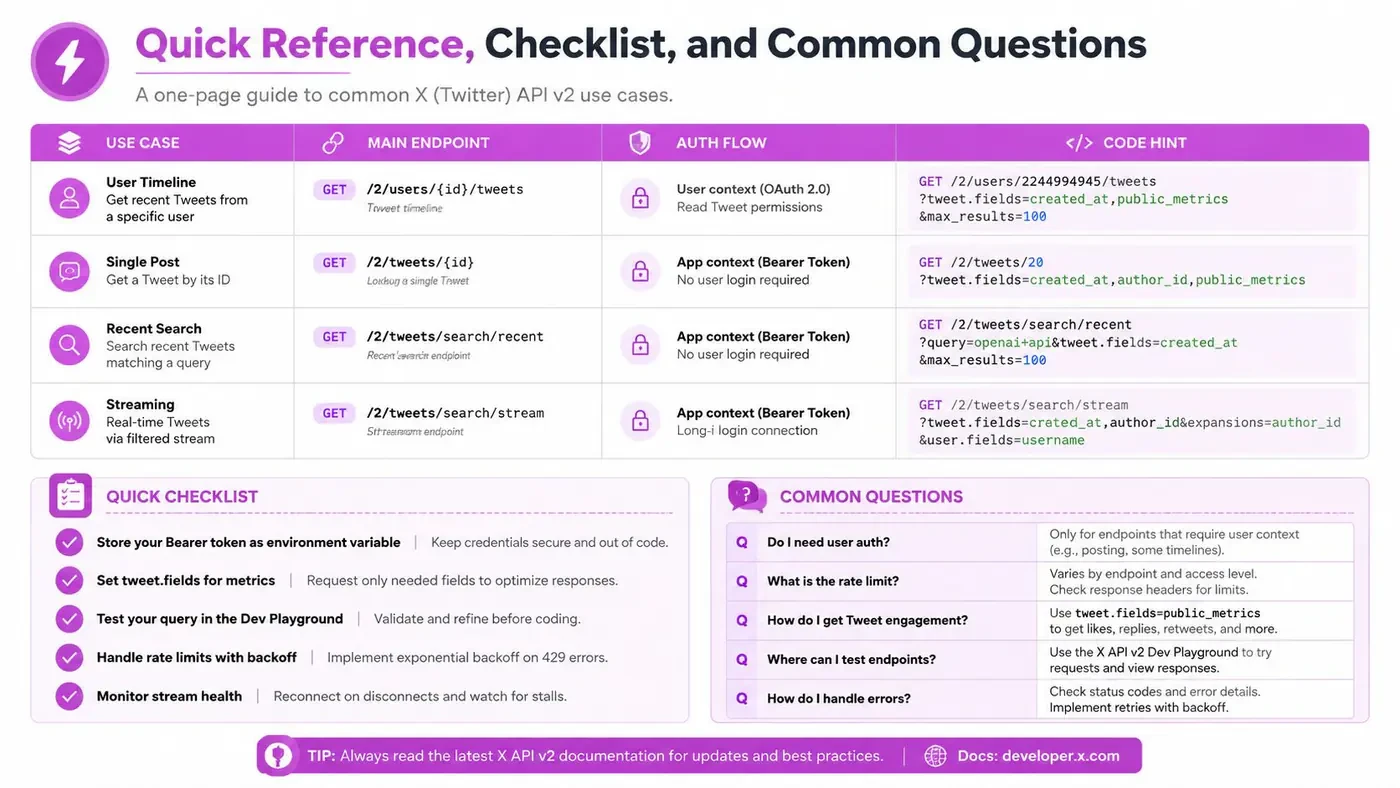
| Example category | Main endpoint | Authentication | Code hint |
|---|---|---|---|
| User timeline | GET /2/users/:id/tweets |
App-only or user context, depending on requested data | Add tweet.fields=public_metrics |
| Single post | GET /2/tweets/:id |
Bearer token for supported public reads | Fetch one post and inspect its fields |
| Recent search | GET /2/tweets/search/recent |
Bearer token | Use operators and filters |
| Filtered stream | GET /2/tweets/search/stream |
Bearer token | Keep the connection open and reconnect safely |
| Create a post | POST /2/tweets |
OAuth 2.0 PKCE or OAuth 1.0a user context | Send JSON with text |
| Upload media | POST /2/media/upload |
User-context authentication | Upload first, then attach the returned media ID |
First 30 Minutes Checklist
- Create the project and app. Set up your X developer app before writing code.
- Store credentials safely. Keep tokens in environment variables, not front-end code.
- Confirm one read works. Test a bearer-token request against a supported public endpoint.
- Add the fields you need. Set
tweet.fieldsinstead of relying on defaults. - Handle limits early. Read the rate-limit headers and add backoff before you need it.
- Set a billing budget. Pay-per-use access should fail predictably before it surprises you.
Frequently Asked Questions About the X API
Which access model do I need?
Start with pay-per-use access and a strict budget if you’re testing an idea or building within the self-serve Post-read cap. Qualifying requests to your own data use lower Owned Read pricing. Contact X about Enterprise access if you need higher volume, custom limits, or dedicated support.
Why am I getting a 401?
That usually means the credentials are wrong, expired, revoked, or formatted incorrectly in the header. Confirm the token type and authentication method required by the endpoint before rotating credentials.
Why am I getting a 403?
A 403 usually means the credentials are valid but the app or user token lacks the required permission, scope, or endpoint access. Check app permissions and the consented user scopes, then issue a new user token if those settings changed.
Are official sample examples safe to use in production?
They’re useful reference code, but you still need to review authentication, secret storage, status handling, retries, pagination, logging, and data retention before shipping them.
If you want a workflow that remembers your niche, helps you find better replies, and turns API-driven research into consistent publishing, explore Xholic AI. It’s built to help you decide what to say next, which conversations are worth joining, and what ideas are worth saving when you’re working on X every day.